관계도
+----------------------------+
| Kubernetes Cluster |
| +-----------------------+ |
| | Node 1 | |
| | +-----------------+ | |
| | | Pod 1 | | |
| | | (Container A) | | |
| | +-----------------+ | |
| | +-----------------+ | |
| | | Pod 2 | | |
| | | (Container B) | | |
| | +-----------------+ | |
| +-----------------------+ |
| +-----------------------+ |
| | Node 2 | |
| | +-----------------+ | |
| | | Pod 3 | | |
| | | (Container C) | | |
| | +-----------------+ | |
| +-----------------------+ |
+----------------------------+
간단 약어
- pod: po
- deployment: deploy
- service: svc
- serviceaccount: sa
많이 쓰는 명령어
k get pods -o wide
k edit pod [pod name]
현재 작동하고 있는 엔터티의 yaml을 수정
esc :w 로 파일을 저장한다음 파드 삭제 후 새로 적용해야 함
yaml 구조
- kind
- metadata
  - name
  - namespace
Deployment
- create
k create deploy nginx-deploy --image=nginx:1.16 --replicas=1
Rolling update
애플리케이션을 점진적으로 배포함.
서비스 중단 없이 새로운 버전으로 업그레이드 한다
- image 변경
k set image deployment/[deployment 이름] [컨테이너이름]=[변경할 이미지]
예시:kubectl set image deployment/nginx-deploy nginx=nginx:1.17
Service
k expose pod [pods name] --name=[service name] --port=[]
ClusterIP (기본값):
클러스터 내부에서만 서비스가 노출됩니다.
클러스터 내 다른 Pod들 간에 통신할 수 있도록 해줍니다.
용도: 클러스터 내부에서만 통신이 필요한 서비스.NodePort:
각 노드의 IP와 특정 포트를 통해 서비스가 외부에 노출됩니다.
외부 트래픽은: 형식으로 서비스에 접근할 수 있습니다.
용도: 외부에서 클러스터로의 접근이 필요한 경우, 로드 밸런서를 사용하지 않고 서비스를 외부에 노출하려는 경우.
kubectl 로 NodePort 를 설정할 수 없음LoadBalancer:
클라우드 제공업체의 로드 밸런서를 통해 외부에 서비스가 노출됩니다.
로드 밸런서가 자동으로 할당되며, 외부 IP가 서비스에 할당됩니다.
용도: 클라우드 환경에서 외부 트래픽을 서비스로 라우팅하려는 경우.
Pod
yaml 파일 간단하게 생성하기
k run ~~ --dry-run=client -o yaml > ~.yaml
label
kubectl run my-pod --image=nginx --labels="tier=frontend,env=production"k get pods --show-labels
command
실행 쉘 커맨드 작성
- spec - containers - command 에 작성
공백을 기준으로 두 가지 방법으로 작성 가능 - 대괄호 사용
command: [ "sleep", "4800" ] - 대시로 따로 작성
command: - sleep - 4800
exec
pods 내에서 명령을 실행함k exec busybox -- nslookup nginx-resolver-service
static pod
/etc/kubernetes/manifests 아래에 yaml 파일을 만들어두면 kubelet 에 의해 자동으로 pod 가 생성된다
Volume
emptyDir
pod 가 생성될 때 함께 생성됨
pod yaml 에서 volumes 설정해주며 함께 생성함
apiVersion: v1
kind: Pod
metadata:
  name: redis-storage
spec:
  containers:
  - name: redis
    image: redis:alpine
    volumeMounts:
    - mountPath: /data
      name: redis-data
  volumes:
  - name: redis-data
    emptyDir: {}
pv, pvc
pv: 실제 스토리지 리소스 정의
pvc: pv를 요청하는 리소스
pod에서는 pvc를 사용해 pv를 요청, pv에서 정의된 storage를 사용한다.
apiVersion: v1
kind: PersistentVolume
metadata:
  name: pv-analytics
spec:
  capacity:
    storage: 100Mi
  accessModes:
    - ReadWriteMany
  hostPath:
path: /pv/data-analytics- accessmode
- ReadWriteOnce
the volume can be mounted as read-write by a single node. ReadWriteOnce access mode still can allow multiple pods to access the volume when the pods are running on the same node. For single pod access, please see ReadWriteOncePod. - ReadOnlyMany
the volume can be mounted as read-only by many nodes. - ReadWriteMany
the volume can be mounted as read-write by many nodes.
- ReadWriteOnce
- pvc 생성
- pv의 capacity, access 알아야 적절한 pv와 결합할 수 있음
k get pv - yaml
apiVersion: v1 kind: PersistentVolumeClaim metadata: name: myclaim spec: accessModes: - ReadWriteOnce resources: requests: storage: 10Mi
- pv의 capacity, access 알아야 적절한 pv와 결합할 수 있음
- pov 설정
containers.volumeMounts, volumes 설정- volumes : Pod 레벨에서 정의됩니다. 여기에는 Pod에서 사용할 모든 Volume(스토리지)의 설정을 지정합니다. 이 필드는 실제로 스토리지를 정의하거나 이미 존재하는 PersistentVolume(PV)을 PVC(PersistentVolumeClaim)를 통해 연결하는 역할을 합니다.
- volumeMounts는 컨테이너 레벨에서 정의됩니다. 이 필드를 사용하여 컨테이너 내부에 특정 경로를 지정하고, 해당 경로에 volumes에서 정의한 스토리지를 마운트합니다.
- mountPath: "/data": 컨테이너 내부의 파일 시스템 경로입니다. 이 경로에 volumes에서 정의된 스토리지가 연결됩니다.
- name: pv-1: volumes에서 정의한 Volume의 이름을 참조합니다. 이를 통해 Pod 내에서 정의된 Volume과 컨테이너 내부의 경로를 연결합니다.
apiVersion: v1 kind: Pod metadata: creationTimestamp: null labels: run: use-pv name: use-pv spec: containers: - image: nginx name: use-pv resources: {} volumeMounts: - mountPath: "/data" name: pv-1 volumes: - name: pv-1 persistentVolumeClaim: claimName: my-pvc
securityContext
컨테이너의 보안을 설정하는 부분
- capabillities
capabilities.add를 통해 특정한 Linux 커널 권한을 추가로 부여
apiVersion: v1
kind: Pod
metadata:
  name: security-context-demo-4
spec:
  containers:
  - name: sec-ctx-4
    image: gcr.io/google-samples/hello-app:2.0
    securityContext:
      capabilities:
        add: ["NET_ADMIN", "SYS_TIME"]
etcd
etcd backup
[Operating etcd clusters for Kubernetes
etcd is a consistent and highly-available key value store used as Kubernetes' backing store for all cluster data. If your Kubernetes cluster uses etcd as its backing store, make sure you have a back up plan for the data. You can find in-depth information a
kubernetes.io](https://kubernetes.io/docs/tasks/administer-cluster/configure-upgrade-etcd/#snapshot-using-etcdctl-options)
- 필요한 옵션 확인
> ETCDCTL_API=3 etcdctl snapshot save -h
ETCDCTL_API=3 etcdctl --endpoints=https://127.0.0.1:2379 \
--cacert=<trusted-ca-file> --cert=<cert-file> --key=<key-file> \
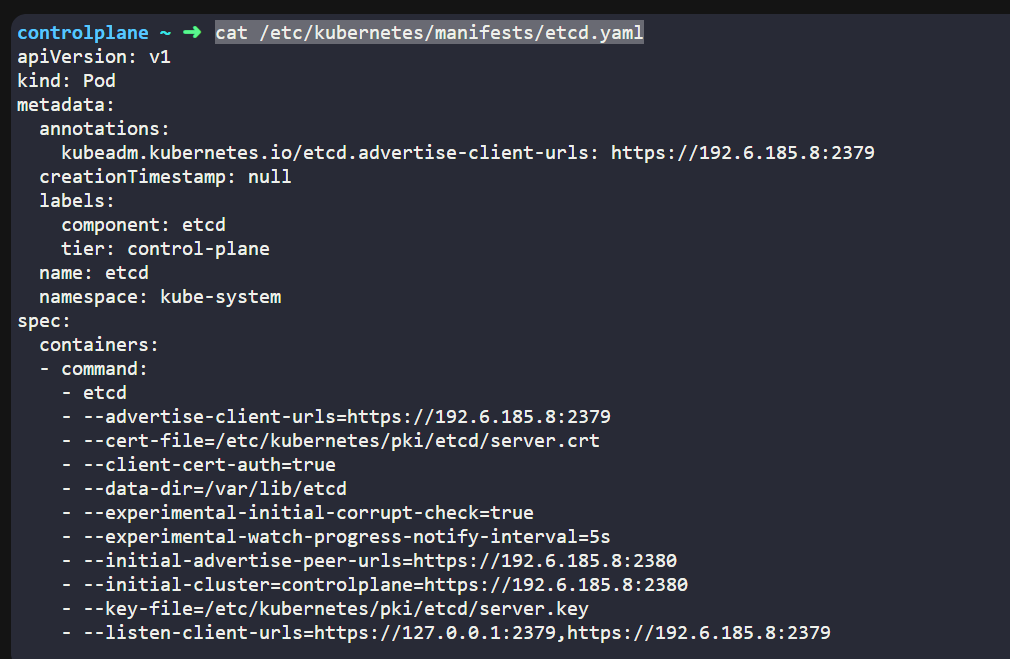
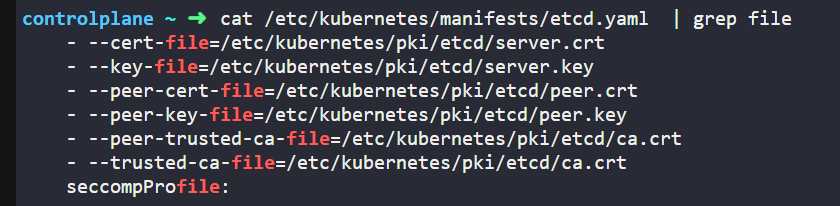
snapshot save <backup-file-location>endpoints, cacert, cert, key 를 설정해줘야 함 ( ETCDCTL_API=3 도 꼭 해줘야 함)
etcd 에 대한 설정이 되어 있는 파일을 참고하여 입력해준다
> cat /etc/kubernetes/manifests/etcd.yaml
grant user
create CSR -> certificate approve -> create role -> create Rolebinding
CSR 생성
Kubernetes에서 "Certificate Signing Request"의 약자로, SSL/TLS 인증서를 요청하는 표준 프로세스
- CSR의 역할
CSR은 클러스터 내에서 특정 엔터티가 인증서를 요청할 때 사용됩니다. 주로 다음과 같은 상황에서 활용됩니다: - 사용자 인증:
클러스터에 접근하려는 사용자가 인증서를 발급받아야 할 때. - Pod 또는 서비스 인증:
클러스터 내부에서 Pod나 서비스가 서로 통신하기 위해 TLS 인증서를 사용하려고 할 때. - 클러스터 간 통신:
여러 Kubernetes 클러스터가 상호 연결되는 환경에서.
.csr 파일이 존재해도 이를 k8s 에서 사용할 수 있는 리소스로 만들어야 함
cat <<EOF | kubectl apply -f -
apiVersion: certificates.k8s.io/v1
kind: CertificateSigningRequest
metadata:
  name: myuser
spec:
  request: LS0tLS1~~~
  signerName: kubernetes.io/kube-apiserver-client
  expirationSeconds: 86400  # one day
  usages:
  - client auth
EOF
certificate
CSR 생성 후 승인을 해줘야 함 (초기는 Pending 상태)k certificate approve [CSR 명]
create role
kubectl create role developer --verb=get,list,update,delete --resource=pods -n developer
k authk auth can-ikubectl auth can-i get pods --namespace=development --as john
Role Binding
k create rolebinding john-developer --role=developer --user=john -n development
DNS
nslookup : DNS를 확인하고 문제를 해결하는 데 사용되는 네트워크 명령어
- Service DNS 조회or
kubectl exec busybox-dns -- nslookup nginx-resolver-service > /root/CKA/nginx.svckubectl run test-nslookup --image=busybox:1.28 --rm -it --restart=Never -- nslookup nginx-resolver-service kubectl run test-nslookup --image=busybox:1.28 --rm -it --restart=Never -- nslookup nginx-resolver-service > /root/CKA/nginx.svc- Pod DNS 조회
kubectl get pod nginx-resolver -o wide kubectl run test-nslookup --image=busybox:1.28 --rm -it --restart=Never -- nslookup <P-O-D-I-P.default.pod> > /root/CKA/nginx.pod
pod ip 의 . 을 - 로 바꾸어서 넣어준다
node
node 이동
k get nodes -o wide로 IP 주소를 얻음ssh [IP]
grant serviceaccount
k create serviceaccount pvviewer
- RoleBinding과 ClusterRoleBinding
- Role은 네임스페이스 범위에서만 사용할 수 있기 때문에 RoleBinding을 사용하여 특정 네임스페이스에 적용합니다.
- ClusterRole은 클러스터 전역에서 사용할 수 있기 때문에 ClusterRoleBinding을 사용하여 클러스터 전역 또는 여러 네임스페이스에서 권한을 부여합니다.
clusterrole
kubectl create clusterrole pvviewer-role --verb=list --resource=persistentvolumes
clusterrolebinding
kubectl create clusterrolebinding pvviewer-role-binding --clusterrole=pvviewer-role --serviceaccount=default:pvviewer
serviceAccount 사용 하는 pod 생성
k run pvviewer --image=redies --serviceaccount=pvviewer
--serviceaccount 는 못씀. yaml 생성해야됨
apiVersion: v1
kind: Pod
metadata:
  creationTimestamp: null
  labels:
    run: pvviewer
  name: pvviewer
spec:
  serviceAccountName: pvviewer
  containers:
  - image: redis
    name: pvviewer
    resources: {}
  dnsPolicy: ClusterFirst
  restartPolicy: Always
status: {}
Kubernetes에서 serviceAccountName을 Pod에 설정하면, 해당 Pod가 특정 서비스 계정(Service Account)을 사용하게 됩니다. 서비스 계정은 Pod가 클러스터에서 다른 리소스에 접근할 수 있도록 권한을 부여하는 역할을 합니다.
internalIP
json 포맷
-o json: output 을 json 형태로 출력
jq
jq -c 'paths' : json 의 모든 경로 출력
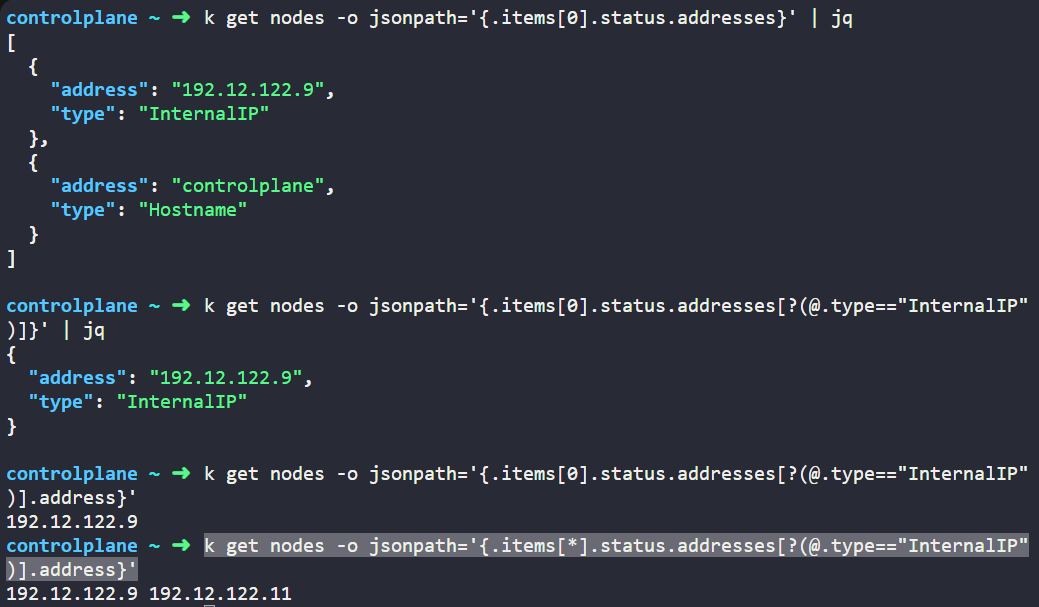
jsonpath
경로를 입력하면 데이터를 추출함k get nodes -o jsonpath='{.items[*].status.addresses[?(@.type=="InternalIP")].address}'
- function
@: current object- ?() : filter